Preserving memories is an essential aspect of our lives. One of the most powerful ways to capture moments is through photography. However, as time passes, these cherished memories captured on film or paper can degrade, losing their original quality and luster. Luckily, with the advent of digital technology, it’s now possible to breathe new life into these old photos through the art of photo restoration.
Understanding Photo Restoration
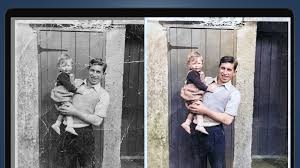
Photo restoration is the process of enhancing, repairing, and revitalizing old or damaged photographs to their former glory. This involves digitally repairing scratches, tears, discoloration, and other forms of damage that may have occurred over time. With the advancements in software tools and techniques, even amateur photographers can undertake DIY photo restoration projects with relative ease.
The Importance of Preserving Old Photos
Old photographs hold sentimental value and are often treasured family heirlooms. They serve as windows to the past, allowing us to reconnect with our personal history and heritage. Preserving these images not only honors our ancestors but also provides future generations with a glimpse into their family legacy https://old-photo-restoration.ai/. Additionally, restored photos can be shared and enjoyed with friends and family, fostering a sense of nostalgia and belonging.
Tools and Techniques for DIY Photo Restoration
Before embarking on a DIY photo restoration project, it’s essential to gather the necessary tools and familiarize yourself with the techniques involved. Some of the essential tools include:
- Photo Editing Software: Programs like Adobe Photoshop, GIMP, or online platforms such as old-photo-restoration.ai offer powerful tools for restoring old photos. These software solutions enable users to remove imperfections, adjust colors, and enhance overall image quality.
- Scanner: A high-quality scanner is essential for creating digital copies of old photographs. Scanning at a high resolution ensures that you have sufficient detail to work with during the restoration process.
- Digital Pen Tablet: While not mandatory, a digital pen tablet can greatly enhance precision and control when performing detailed restoration work, such as removing scratches or repairing fine details.
- Reference Images: If possible, gather reference images of how the photo originally looked or consult with family members who may remember details that can aid in the restoration process.
Step-by-Step Guide to DIY Photo Restoration
- Digitize the Photo: Begin by scanning the old photograph at a high resolution. Save the scanned image in a lossless format such as TIFF to preserve as much detail as possible.
- Assess Damage: Carefully examine the scanned image to identify areas of damage such as scratches, tears, stains, or fading. Take note of any areas that require attention and prioritize the restoration process.
- Start with Basic Adjustments: Begin by making basic adjustments such as correcting exposure, contrast, and color balance. This can help improve the overall appearance of the image before diving into more detailed restoration work.
- Remove Imperfections: Use the cloning and healing tools in your chosen photo editing software to remove scratches, tears, and other imperfections. Take your time and work meticulously to ensure a seamless restoration.
- Repair Tears and Missing Areas: For photos with significant damage such as tears or missing sections, use the clone stamp tool to reconstruct missing details. This may involve copying nearby areas of the image and blending them together seamlessly.
- Restore Color and Contrast: Adjust color levels and contrast to restore vibrancy and depth to the image. This may involve selectively adjusting colors or using tools such as curves and levels to fine-tune the overall tone.
- Final Touches: Once the major restoration work is complete, perform any final touch-ups and refinements to ensure the photo looks its best. Pay attention to small details such as sharpening edges and removing any remaining blemishes.
- Save and Share: Once you’re satisfied with the restoration, save the final image in a suitable format such as JPEG or PNG. Consider creating backups and sharing the restored photo with family members to preserve and celebrate your shared history.
Conclusion
DIY photo restoration is a rewarding endeavor that allows individuals to breathe new life into old photographs and preserve cherished memories for future generations. With the right tools, techniques, and a little patience, even amateur photographers can transform old pictures into pristine works of art. Whether it’s repairing scratches, restoring faded colors, or reconstructing missing details, the process of photo restoration is a labor of love that honors the past while celebrating the present.
Visit old-photo-restoration.ai to explore advanced AI-powered tools for effortless photo restoration and preservation.
To use AI restore old photo online free visit here now